Syllabus
Queens College
Art Department – Photography & Imaging
Digital Pinhole Imaging & Large Format Printing
PHOTO 245/ARTS 6203-05, 7272-07
Tuesday 10:00am-1:50pm
I-Building Rm 213
Spring 2024
Instructor: Matt Greco
Office: Klapper 106
Hours: By Appt
Email: matthew.greco@qc.cuny.edu
Course Website: professorgreco.com
Course Description:
Digital Pinhole Imaging & Large Format Printing will emphasize the design and creative aspects of image making through the design-thinking and making of a lens less camera utilizing a laser cutter; capturing, preparing and printing of digital images; and the digital workflow of large format printing on various media with archival pigment inkjet printers. This course will reinforce the basics of photography such as composition, subject matter, and point of view through close critique of student work. In addition to the traditional concerns of photography we will explore the effects that new digital tools have on the art of photography and how we communicate with this new photography. The course will study the aesthetic of pinhole photography and its tendency toward abstraction with a focus on new and non-traditional inkjet media. This course will be as much about making with your hands as it will be seeing with your eyes. This course will examine the digital design and fabrication process required to design and create a laser cut pinhole camera. Students will learn the design, fabrication, and coding required to create a simple digital sensor, and the production workflow of large format digital printing.
Course Objectives:
At the close of this course the successful student will have a comprehensive understanding of the operation of primitive lens-less “pinhole” cameras and the history and origin of such cameras. They will become familiar with the software and equipment involved in creating files for and getting materials processed on a laser cutter. They will master an image workflow that includes familiarity with BW silver gelatin paper, developing BW prints, and the equipment/tools used in an analog darkroom process. They will master an image workflow that includes scanning print material, post-production digital software processes, and prepping images for large format print. Students will be introduced to various media meant for large format inkjet printing and will add various mixed media to those prints. Students will expand their vocabulary to include the proper terminology for creating and critiquing photographs. They will demonstrate the ability to think creatively, form project ideas, and follow those ideas from conception to realization.
Course Requirements:
Students will be expected to complete all assignments on time and to the best of their ability. Students are expected to attend every class but life does happen so you get 3 absences, after that, additional absences will likely result in missed material and thus a lower grade. Be on time please; tardiness is as bad as absences. I will begin class a few minutes late to give everyone time to get settled in – do not abuse this. We will have a final critique; attendance is required.
Reasonable Accommodations for Students with Disabilities:
Students with disabilities needing academic accommodation should register with the Special Services Office by emailing QC.SPSV@qc.cuny.edu. For more information about services available to Queens College students, visit the Office of Special Services website: https://www.qc.cuny.edu/studentlife/services/specialserv/Pages/default.aspx.
CUNY Policy on Academic Integrity:
Only your own photos, images and/or writing are permitted for use in projects. The unauthorized use of images and compositions that are not your own is considered plagiarism. Academic Dishonesty is prohibited in The City University of New York and is punishable by penalties, including failing grades, suspension, and expulsion as provided at https://www.cuny.edu/about/administration/offices/legal-affairs/policies-procedures/academic-integrity-policy/.
Course Website:
Please check our course website every week for updates to the syllabus or schedule, links to information and resources, and a student gallery page where we will showcase your work throughout the semester.
Grades:
Design – 30% (sketches, prototype, Illustrator files)
Fabrication – 30% (1 pinhole camera, 4 BW prints from capture)
Final critique and final portfolio – 40% (2 large format prints 1 w/ additional mixed media)
Printing:
For our analog prints we will utilize the BW darkroom facilities. For our digital prints we will be utilizing the Klapper Imaging Lab. The digital prints will be paid for through your M&T fee. Students will be required to submit your prints to the lab. We will be printing 30”x40” for this class. Keep prints safe and clean; you will show these at final critiques.
Fabrication:
We will be utilizing the Klapper Fabrication Lab to laser cut and/or engrave your files for this course. Many of the materials will be paid for through your M&T fee. Some will need to be provided by you. The QC Makespace is also available to you for fabricating your designs. See the process for gaining access to the QC Makerspace here https://library.qc.cuny.edu/makerspace/
Field Trip:
We will take a field trip to Cooper Hewitt Smithsonian Design Museum – 2 E 91st St. Attendance is required. Time will be allotted for travel to and from Queens College campus.
Rough Outline of Projects (subject to change):
1- Pinhole Camera – Design & Fabricate
• Using pinhole camera examples, design a pinhole camera
• Create prototype from cardboard
• Use Adobe Illustrator to create digital file for laser cutter
• Export design file as SVG and laser cut chosen material
• Assemble pinhole camera – good fit and finish
2- Capture, Develop
• Capture 4 images on BW photo paper
• Use BW analog darkroom process to develop prints
3- Post-process BW prints
• Scan BW prints
• Edit, size, and prep for large format printing
4- Large Format Prints – Mixed Media
• Choose non-traditional media for large format prints
• Produce 2 large format prints from files created from pinhole capture
• Add mixed media to 1 of your large format print
Supplies:
The supplies we will use throughout the semester will vary. Below is a list of items you will need to buy (subject to change, recommendation links can be found on course website):
• 25 sheets 5×7 RC VC Pearl surface B&W printing paper
• Wood/acrylic glue
• 2” black gaffers tape
• black paint – matte
• charcoal, paint, markers
• fabric, thread, asst materials for mixed media
Schedule (subject to change):
Week 1: 1.30
Introductions, course outline, review syllabus
required equipment, recommended reading
NSF Treatment Course – MAkeSTEAM Q – surveys, collecting work
Week 2: 2.6
Check logins – computer, Adobe
Short History of Photography focused on course content
Camera Obscura? What is a pinhole camera?
Week 3: 2.13
Explore various pinhole camera designs – inspect example pinhole camera
Laser Engravers/Cutters History & Operation
Material choices for laser cutting
Overview of process – illustrator, laser cutter, fabrication, BW paper image capture, scanning/post-production & large format printing
Designing pinhole camera
Make sketches of pinhole camera for 2.24
Week 4: 2.20
Designing pinhole camera
Review sketches
Using Adobe Illustrator to create plans of pinhole camera for laser cutting
Week 5: 2.27
Designing pinhole camera
Transferring drawings to Illustrator
Final decision on pinhole camera material
Finalize laser cutter file
Assembly methods finalized
Order glue, tape, and paint
Week 6: 3.5
Laser Engraving/Cutting Demo
Cut your pinhole camera out
Fabrication
Week 7: 3.12
Laser Engraving/Cutting Review
Cut your pinhole camera out cont.
Fabrication cont.
BW print development review
Load BW paper – 1st capture – process
Load BW paper – 2nd capture – process
Week 8: 3.19
Scanning prints
Adobe Photoshop – capturing scans, inverting, editing, interpolating
Choosing inkjet media
Scan and process BW prints for large format print
Load BW paper – 3rd capture – process
Week 9: 3.26
Load BW paper, capture, and develop
Scan and process BW prints for large format print
Week 10: 4.2
Load BW paper, capture, and develop
Scan and process BW prints for large format print
Submit image #1 for print
Week 11: 4.9
Load BW paper, capture, and develop
Scan and process BW prints for large format print
Sketch ideas for mixed media print
Submit image #2 for print
Week 12: 4.16
Field Trip – Cooper Hewitt Smithsonian Design Museum
Week 13: 4.23
NO CLASSES – SPRING BREAK
Week 14: 4.30
NO CLASSES – SPRING BREAK
Week 15: 5.7
Choose print for mixed-media
Create mixed-media print
NSF Surveys – Course Evaluations
Week 16: 5.14
Workday Prep for Final
Review work for final portfolio
Week 17: 5.21
Final Crit
Each student will show 2 large format final prints
End of Semester
All work due 5.24 – 9am
______________________________________________________________________________
Resources
Store Recommendations:
http://www.bhphotovideo.com/
http://www.adorama.com/
Materials:
• IIlford MULTIGRADE RC Deluxe Paper (Pearl, 5 x 7″, 25 Sheets)
• Wood / acrylic glue
• 2” black gaffers tape
• black acrylic paint – matte
• charcoal, paint, markers
• fabric, thread, asst materials for mixed media
Printing:
Send a cloud drive link (Dropbox, Google Drive, One Drive) link to the lab that includes your images for print.
Klapperimaging@qc.cuny.edu – prints can be picked up in Klapper 108.
Save your files using this naming convention – “first initial-last name_30x40 print_#1_media.jpg” with the number increasing with more than one file. Include the media you want to print on.
For example – “mgreco_30x40 print_#2_canvas.jpg”
Media available include double-weight matte, hot press fine art, cold press fine art, and canvas.
Software:
Adobe CC
Adobe for CUNY:
https://cisweb.cuny.edu/covid19/Accessing-AdobeCreativeCloud-COVID19-Outbreak.pdf
LinkedIn Learning (was Lynda.com)
Pinhole Aperture:
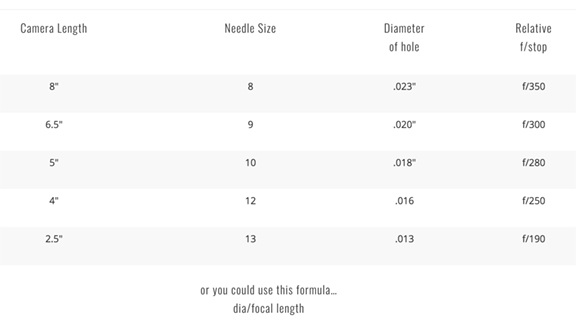
.35mm or 0.013in or #13 needle
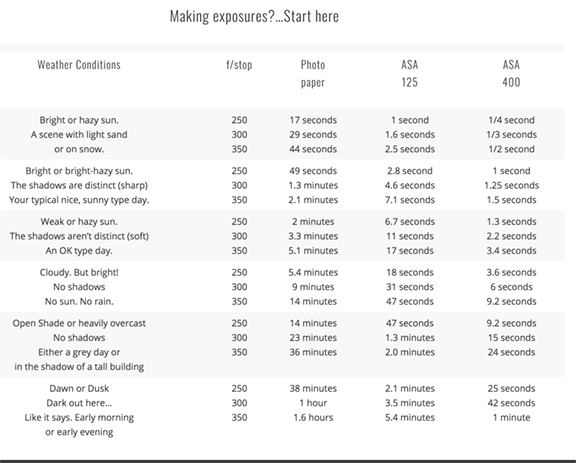
Depending on your camera design your effective F-stop can be seen below.
These are very rough guides – most of you will have a relative f/stop of f/350
Assignment Sheets/Instructions:
Assignment #1 – Design and Fabrication
Assignment #2 – Expose and Print
Assignment #4 – Mixed Media Print
Pinhole Relative F-Stop Guide:
Pinhole Exposure Guide:
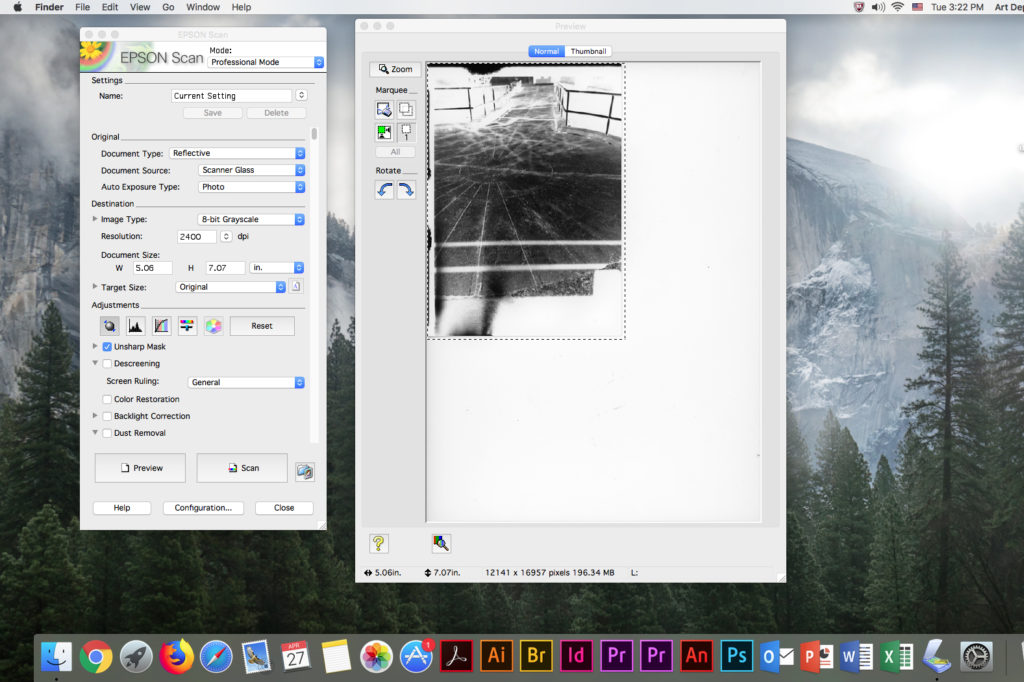
Scanner Settings for Scanning 5×7 Pinhole Capture:
Scanning & Prepping 5×7 Prints for 30×40 Inkjet Output:
Field Trip:
Cooper Hewitt Smithsonian Design Museum
2 E 91st St, New York, NY 10128 – (212) 849-8400 – https://www.cooperhewitt.org/
Equipment Reviews:
http://www.dpreview.com/
Online Photography Magazines:
http://www.aperture.org/
http://www.dpmag.com/
http://www.popphoto.com/
http://www.shutterbug.com/
http://www.pdnonline.com/pdn/index.shtml
http://www.bandwmag.com/
http://www.diyphotography.net/
Photography Exhibitions in NYC:
New York Photography Diary
_____________________________________________________________
Lectures
Lessons:
History of Photography, Pinhole Cameras, & Laser Cutting
Aesthetics of Pinhole, Abstract, & Mixed-Media Photography
Artists:
James Presley Ball
